 |
|
 |
|
|
|
One of the classic CCD cameras is the SBIG ST7, it features a separate autoguide CCD within the camera. It was at the top of my "wanted" list despite it's price tag. Terry Platt, of Starlight Xpress, had been hinting for some time that an auto tracking Starlight Xpress camera was soon to be launched. After months of eager anticipation, the Starlight solution finally arrived and was displayed at European Astrofest in early February 2000.
The technique used for auto guiding is well covered on the Starlight web
site and works by
using I ordered one from Astrofest and began using it in late February 2000. The original software only offered monochrome support. Starlight have now introduced a free upgrade to full colour it's available for free download from their web site. The package consists of a small interface, RS232 cable, autoguide cable, software on a single floppy disk and a manual. The interface is powered from the RS232 port on your laptop. The autoguide output is compatible with the 'ST4' autoguider input of most high grade mounts, it is opto isolated so there won't be damage to either the mount or the interface. The interface has been tested with the Meade LX200, Celestron CI700 and Losmandy mounts. Other mounts may not be suitable. Use The first problem to occur was the software 'interface' window couldn't be displayed on my laptop's 640 x 480 display, it was too tall. While I could circumnavigate the problem by switching to 800 x 600, it wasn't really the answer when using a 6.4 inch screen on a mini laptop (Toshiba Libretto). A couple of days after bringing the problem to their attention, Starlight re-wrote the software and fixed the problem. Great service guys. There are a few odd difficulties with the software, mainly it revolves around the user interface being a little 'gritty'. You have to go back and forth between various parts of the program in order to take an image, maybe later versions of the software will lead you on a logical route from taking a test frame to a final image. Once the software is loaded on a laptop (it will also work on a standard PC) the next step is to check it drives the mount. My Losmandy G-11 mount has an 'ST4' autoguide socket and works just fine with the STAR 2000. With the telescope pointing south and the counter weight on the east side of the mount (in the northern hemisphere), I needed to reverse the north/south and east/west settings in the STAR 2000 software. A test routine is built into the program for checking the backlash in the mount's gears and to learn the slewing time of the mount. I didn't set the 'TVC' (eliminates backlash on the ra drive by a quick reversal of the motor after guiding corrections), nor did I use the 'PEC' (periodic error correction) on the G-11 mount. The only adjustment made was to set the guide rate at 'x0.5' rather than the power up default of 'x0.3'. The STAR 2000 test routine moves the mount, takes a few test images, and inputs it's own calibration settings into the program. Unfortunately, the test routine isn't clever enough to discover if the mount is moving in the wrong direction! These test routine 'calibrations' are saved automatically and don't need to be run again unless there is a big change to the mount (it might need re-running if the telescope is used on the other side of the mount). You should also re-run the test routine if you add (or remove) a focal reducer. A typical session consists of the following:
If the program isn't guiding you can abort the session by pressing the 'escape' key. The most likely reason for a lack of guiding seems to be waiting too long between choosing your guide star and starting to take the image - it might drift too far for the software's window. Another reason for guiding problems can be choosing a star not sufficiently isolated from other stars, this sometimes seemed to cause the program to hop to another star. Not a real problem so long as you know the program can track using your mount and telescope, just choose another star to track with.
Considering the low cost of the interface, this package is incredible. It worked 'first time' and seems very easy to use. Not having used an ST7 camera, I don't know how well it compares. There are some down sides to the technique employed with the STAR 2000. The first one is a reduction in sensitivity by 50% (only half the pixels are used to take the image, although it doesn't degrade the resolution), the other, perhaps more serious issue is the image brightening in the top left hand corner due to light emitted from transistors within the CCD. These issues are covered in the manual and on the web site, they aren't such a big problem and I can live with the ease of use and the money saved by not buying an ST7! Further details on the Starlight cameras can be found at their web site.
|
||

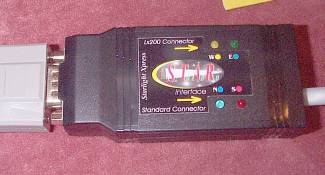 half the pixels to take the image and half to track
with, all that is needed is an interface between the serial port of the laptop
and your telescope mount.
half the pixels to take the image and half to track
with, all that is needed is an interface between the serial port of the laptop
and your telescope mount.
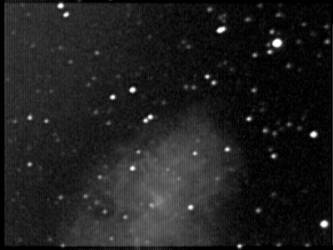 The picture shown here is a 10 minute exposure of
part of M1, it was taken with a MX5-C (older, less sensitive CCD version)
using the earlier monochrome software. The telescope is a Meade 10" f6.3
SCT, mount is Losmandy G-11. Focal length 1600mm. The star shown in the top
right of the image was the one used for guiding, at 1 second exposure, it
is magnitude10. I would suggest using a shorter focal length for most purposes,
the 'magnification' of this image is quite high but shows just how good the
tracking can be.
The picture shown here is a 10 minute exposure of
part of M1, it was taken with a MX5-C (older, less sensitive CCD version)
using the earlier monochrome software. The telescope is a Meade 10" f6.3
SCT, mount is Losmandy G-11. Focal length 1600mm. The star shown in the top
right of the image was the one used for guiding, at 1 second exposure, it
is magnitude10. I would suggest using a shorter focal length for most purposes,
the 'magnification' of this image is quite high but shows just how good the
tracking can be.