|
|
 |
|
|
|
Taking 'Piggy Back' photographs
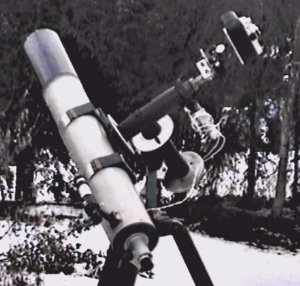
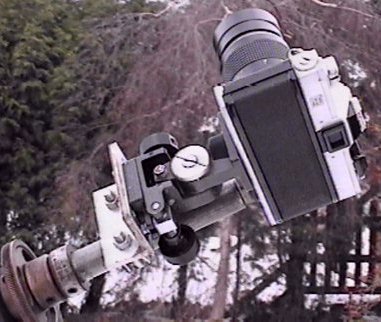
Click on any of the above pictures for an enlarged view - return by right clicking the mouse Taking the idea of mounting an ordinary camera onto a fixed tripod one stage further, we need to counter the rotation of the earth. There are motorised camera mounts on the market at prices ranging from just over 100 UK Pounds to 450 UK Pounds, the limitation on the first one is the lack of any means of polar alignment and the second one is so expensive that it's more cost effective to buy a cheap second hand refractor on an equatorial mount and have a useful scope as well as being able to take better photographs. The choice of both lens and film type are not as limited as is the case with simple astro photography as the need to reduce star trailing is all but eliminated. The factors to now consider are basically how dark the site is and how long you can correct the tracking for without loosing concentration. The choice of equipment really depends on how deep your pockets are, many astronomers will already own a motorised equatorial mount, possibly with a dual axis drive corrector, for those that don't here is a list of what is required to achieve good results with fairly simple equipment: 1. Motor driven equatorial mount, this doesn't need to be elaborate but should ideally have motors on both the ra and declination axis, even without a motor on the declination axis photography will be possible but the maximum exposure will be shorter due to errors in alignment. 2. Some means of adjusting the tracking speed and adjusting the declination motor if fitted. While adjustment isn't essential, it does allow for longer exposure photographs. 3. Assuming you are adjusting the tracking with a drive corrector then an illuminated reticle eyepiece is also needed to see what adjustment to make. The normal focal length of the eyepiece will be 9mm, this can be used with a barlow lens for more critical work. 4. Some means of fitting the camera to the telescope, perhaps the ideal method is to use an adjustable mount like the one shown above. the telescope above is an f9 4.75 inch refractor (about 1000mm focal length), this telescope is ideal for this sort of work.
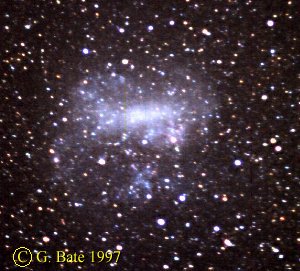
Click on any of the above pictures for an enlarged view - return by right clicking the mouse How do you put it all together? The first requirement is to accurately align the mount onto the pole, easier in the Northern hemisphere than the Southern, some mounts have a built-in polar alignment scope which is very useful. Mount the telescope and fit the camera, find your subject and carefully frame the image in the camera, don't forget to focus on infinity and try a few shots. Initially try fairly wide angle lenses such as a 50mm lens and use fast film, the shot of Orion and the Large Magellanic Cloud are taken on Kodak Ektar 1000 and a 50mm f1.4 lens, (exposure 1 minute) they are not reproduced on the same scale! The shot of M44 is taken with a 300mm f4 lens, exposure 10 mins on Kodak Ektachrome 400. In case you aren't familiar with the Magellanic Clouds they are located in the Southern hemisphere, this shot was taken at an altitude of 14,400 feet in Argentina by my observatory co-owner Graham Bate.
With the basic tripod mounted camera it was fairly easy to include some foreground details such as a local tree, this gave some perspective to the image at the expense of star trailing if the exposure was more than a few seconds, with a piggy back camera it is possible to include some foreground detail while maintaining sharp star images, obviously there are a couple of problems. Problem one is the camera is often mounted in such a way as to prevent it being rotated to give the correct orientation of land and buildings, a ball and socket mounting for the camera is one way around this. Problem two is that you need short exposures of around 2 or 3 minutes maximum to avoid blurred images of the ground, this isn't such a problem as trailing stars and 2 or 3 minutes at f4 with 1600 asa slide film still produces plenty of stars. With Hale-Bopp becoming a superb sight in the early spring, it's a good time to try a few astro photographs so you don't make too many mistakes with the 'Comet of a lifetime', hopefully Hale-Bopp will be even better than Hyakutake was.
|
||||||||||||