|
|
 |
|
|
|
Slide
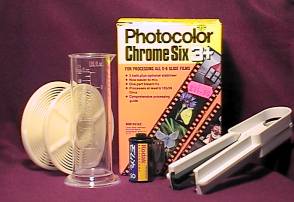
Processing While not being essential, processing your own slides does have enormous benefits for budding astro photographers. The main advantage is being able to take, perhaps, only 3 or 4 images and process them the next day. The method is to put the complete camera and developing tank into a daylight changing bag; open the camera back and cut the film, loading the exposed end into the tank. This is much more economical than waiting weeks to use a roll of 36 exposure film only to find it didn't work as well as you expected. There are several makes of slide processing kit available from high street photographic stores. I use Photocolor E6 kits and have found them quite reliable over several years of processing. Besides the kit you will also need the following items: Washing up bowl (to act as a water bath), developing tank, 3 x 300 ml "medicine" bottles of the flat type, 500ml and 100ml measuring cylinders, thermometer to read between 30 and 50 degrees C, cloth changing bag (to load the film in daylight), scissors, slide mounts, 2 x clothes pegs and a small weight to use for hanging the film up to dry, a film squeegee and a digital stop watch (many wrist watches will suffice) The actual processing is well covered by the instructions in the kit. It's a three bath process and consists of a first developer, second developer, combined bleach fix, washing and drying. There are a few tips I've discovered to make the rather critical temperature control easier: 1. if possible, turn your centrally heated water system down to 50 degrees C the day before. This gives you wash water at roughly 40 degrees for washing the film, if you use cold water it can ruin the film and makes temperature control impossible.
2. gently warm the filled bottles in a microwave oven (loosen the tops first)
this makes it easy to warm them to 38 degrees. Film types One of the problems with using colour slides for astro photography is they are intended for normal exposures of between 1/1000 and 1 second in daylight, certainly not 5 to 30 minutes by starlight! This effects the red, green and blue layers in the film in different ways and gives strange looking colour casts to slides exposed beyond a few seconds, the only "official" way of correcting this is to use a colour correction filter, but even then it isn't possible to correct it 100%. Try experimenting with different film types and perhaps a magenta filter if your results are too green! For a fast lens (no more than F4) try the 'new' Kodak Ektachrome P1600x. It's a 400 asa professional film intended for push processing at an effective film speed of 1600 asa, it is far faster than Ektachrome Elite 400 asa and doesn't produce the horrible muddy brown and green backgrounds that it's 400 asa cousin tends towards. Typical exposures of 2 minutes at f4 produce really superb results. Note that in the UK it's only sold in packs of 5. When exposed at 1600 asa (it's 'rated' speed) it needs to be push processed by two stops, instead of a first developer time around 6 minutes it needs around 13 minutes. Refer to the push processing table supplied with the Photocolor kit for full details. For longer exposures with a back yard telescope, Scotch Chrome 400 pushed to 800asa gives very pleasant results. One problem with suggesting film types is that film changes every couple of years or so. As these films aren't intended to be used for astronomy, it's a case of continual experimentation if your favourite film no longer works well.
|
||