|
|
 |
|
|
|

Using CCDs
One area where amateur astronomy has improved recently is CCD imaging. Modern CCD cameras can be bought for less than 500 pounds sterling that interface directly to a home PC. Couple one to the popular Schmidt-Cassegrain telescopes (SCT) by Meade or Celestron and you are (almost) in business. My own choice of CCD camera is a Starlight Xpress 'SX' one shot colour camera (see a review elsewhere on this site) and a MX5c (also see review on this site). The 'SX' model has been replaced with the 'MX' series. The images shown on this page are all taken with an SX camera camera attached to an ordinary telescope. Before detailing the steps required to use this type of camera, I'd better explain the differences between a one shot colour camera and a monochrome one. The colour camera uses an ordinary camcorder CCD chip by Sony, this has less sensitivity than a monochrome equivalent (around 50% less sensitive). Details of how Starlight Xpress convert monochrome to colour is well explained at their web site. With a monochrome camera many users (myself included) stack short exposures in order to reduce tracking errors. These exposures can be as short as a few seconds and are said to permit image taking without using a driven mount - provided you use a telephoto lens rather than a a telescope.
The original solution was to take relatively long (and guided) exposures of around 6 minutes each, convert them to colour and then stack the colour images if six minutes isn't long enough. One solution for SX camera users is the software written by Bev Ewan-Smith from the COAA observatory in Portugal. Bev's software is available for free and allows Starlight Xpress 'SX' series colour camera users to take short exposure shots and automatically align them later with correct colour registration. This procedure doesn't seem to work using the Starlight software. See the COAA web site for more details. The image of M27 at the top of this page was taken at COAA using this software and consists of 6 x 60 second images stacked then converted to colour. The stacking routine in the program 'SX' is automatic. The matching program for use at the telescope is SXCAP.EXE. This program runs under MSDOS and only needs a fairly simple laptop in order to work well. Bev uses it with a 486sx25 monochrome laptop that cost very little on the second hand market. There is a text file describing the step by step approach I use with this software further down the page. Since this article was originally written, not only have I bought an MX5c camera, I've also bought the STAR 2000 interface for tracking and acquiring images simultaneously. The STAR 2000 interface renders the technique of taking multiple images and stacking them obsolete and avoids the need to manually guide the telescope at all. The STAR 2000 is reviewed elsewhere on this site. Equipment required for deep sky and comet images
1. Equatorially mounted telescope with a reasonably accurate clock drive
on right ascension
Schmidt-Cassegrain telescopes (SCT's) by Meade or Celestron have threaded
rear cells which readily take a CCD camera. Fitting one of these SCT's with
a flip mirror finder (see my review elsewhere on these
pages) gives a very solid coupling and makes life relatively easy for those
taking images. Users of Newtonian reflecting telescopes aren't so fortunate
as many rack and pinion focus mounts cause accessories to sag; this sagging
makes alignment very difficult. Another problem with the Newtonian is a lack
of focus range - adding a flip mirror probably won't allow the scope to focus.
There is a 'Newtonian' alternative to the flip mirror, those with some metal
working skills may care to check The ATM
page for details of a sliding eyepiece mount (look under CCD Cameras).
The alternative of swapping a CCD camera for an eyepiece can be tedious tedious
compared to the flip mirror approach. One solution is to make an adapter
to convert the CCD camera to the same fittings as an SLR camera and make
a matching eyepiece adapter. Provided these are all par focal, you can use
them to find and centre objects with relative ease on any
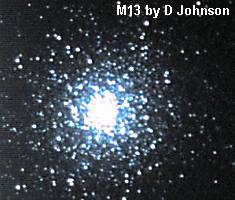
telescope. Most fork mounted SCT's will require a balance weight on the front when adding a CCD camera; in my case a thick plastic bucket served as both a counter weight and dew shield. Another tip: to assist with the focus of an SCT, paint a white dot on the rear cell and a matching one on the edge of the focus knob, you don't need to go to the expense of a digital turns counter. Getting started It's a good idea to practice taking images in daylight, you can easily check focus and it's much simpler than working in the cold and dark. Don't forget CCD cameras are sensitive needing very short exposures in daylight. On a dull day 1/100th of a second will probably overload the CCD. Those with a colour camera are advised to try some images of a colourful object in daylight, using an ordinary camera lens to image a cereal packet is ideal. Once satisfied that you can focus and do basic image processing, it's time to try out the system for real. Some of the more obvious targets are quite difficult - M42 (Orion) and M31 (Andromeda) are likely to disappoint the beginner. A good starting point might be M13, M57 or M27. Globular cluster M13 (Hercules) is both full of bright stars and easy to find, it can be imaged in a few seconds and produces a strong image with my CCD camera in 4 minutes.
The first problem with a CCD is getting it focussed. The Starlight Xpress program 'Pixcolwn' has a focus mode, this allows you to view a small area of the image with the camera being constantly read out. A piece of cardboard, with two holes cut in it, placed over the front lens can assist focus by showing an out of focus star as a double. You don't need to waste money on the commercial version of this. Once satisfied that you are correctly focused, take a shot of between 60 to 120 seconds and do a quick contrast stretch to see what you've got. The new Starlight Xpress 'Pixcolwn' software (ver 1.3) includes a view option that gives an auto contrast stretch of the image. This isn't altering the image that's saved, only your view of it. Summary These are the steps needed to take an image of a deep sky object....
1. Polar align the telescope While the above might sound complicated, it's less of a pain in the neck than guiding for tens of minutes trying to take a photograph. The most important issues are good tracking and not discarding your image files. Frequently it's possible to improve your results at a later date by using more advanced software or alternative techniques. Patience helps too! If you use the Starlight Xpress SX cameras and wish to try the COAA software (and who wouldn't as it's better than the Starlight versions), the conversion routine to follow when processing with Pixcolwn is included as a text file by clicking here References & reviews
SX
|
||

 Because
of the difficulty in aligning images absolutely accurately, trying to align
images and then extract the colour information generally results in random
colours/coloured noise being introduced. This is why the colour camera doesn't
perform well when used 'un-guided' with multiple short exposures on deep
sky objects.
Because
of the difficulty in aligning images absolutely accurately, trying to align
images and then extract the colour information generally results in random
colours/coloured noise being introduced. This is why the colour camera doesn't
perform well when used 'un-guided' with multiple short exposures on deep
sky objects.
 The image on the right shows an MX5c fitted with
a Canon FD series adapter and matching eyepiece adapter.
The image on the right shows an MX5c fitted with
a Canon FD series adapter and matching eyepiece adapter.